How Long Does a Car Battery Last? Average Lifespan Explained

 USD
English
A flat battery can turn a normal trip into a roadside problem, but the remedy is manageable if the battery is undamaged, both vehicles use compatible electrical systems, and you follow the connection order. In short: switch both vehicles off, connect red to the dead battery's positive terminal, red to the donor battery's positive terminal, black to the donor battery's negative terminal, and the final black clamp to a clean metal ground on the disabled vehicle. Start the donor vehicle, then try the disabled vehicle. Remove the clamps in the reverse order.
That short answer is not a substitute for your owner's manual. Some vehicles use remote jump posts, and hybrid or electric vehicles may have model-specific restrictions. Stop if the battery is frozen, cracked, swollen, leaking, unusually hot, or giving off a strong odor. If you cannot identify the correct terminals, call roadside assistance.
Traditional cables also require a compatible donor vehicle. A charged portable jump starter does not. If you often travel alone, keeping a compact unit such as the Eigotrav PD-J220 6000A peak jump starter in the car removes the need to position a second vehicle. It is a 12V jump starter rated on its product page for up to 10L gasoline and 8.5L diesel engines. Those figures are manufacturer compatibility claims, not a promise that every damaged or deeply discharged battery will start.
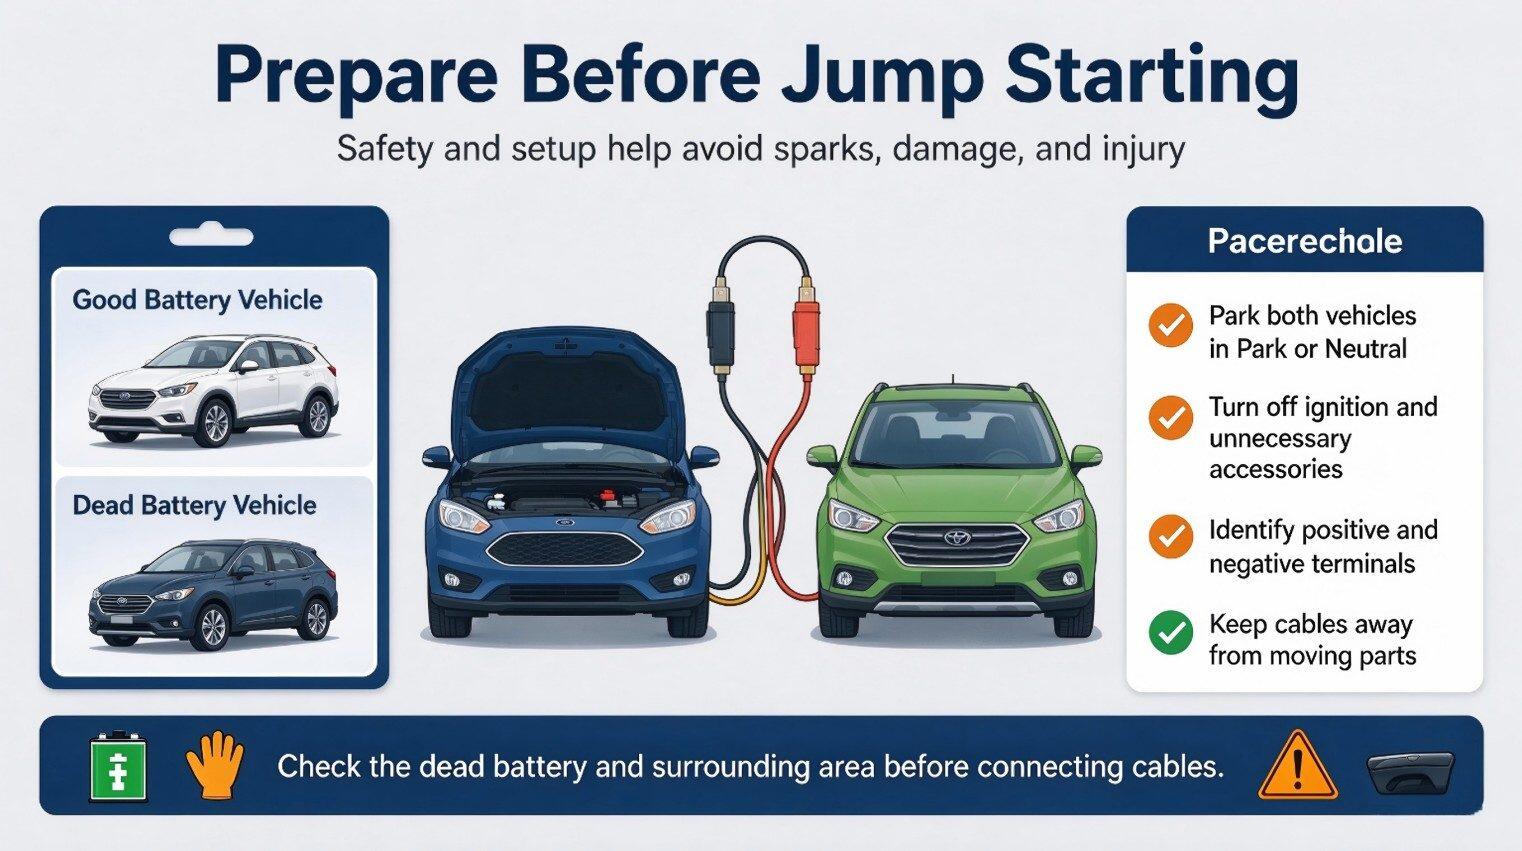
How to jump start a car with cables: know the terms first
Jumper cables are paired insulated conductors with clamps that carry current from a donor battery to a vehicle with a weak battery. Booster cables are another name for the same tool. A jump starter pack is a self-contained battery and control unit that supplies starting current without a donor vehicle. The positive terminal is marked +; the negative terminal is marked - and connects to the vehicle's ground system. Reverse polarity means connecting positive to negative or negative to positive, an error that can damage electrical components and create dangerous sparks.
|
Term |
Plain-English definition |
What to look for |
|
Jumper cables |
Two heavy insulated cables used between a donor source and a disabled vehicle |
Red and black clamps, intact insulation, clean jaws |
|
Booster cables |
Regional name for jumper cables |
Same connection sequence as jumper cables |
|
Jump starter pack |
Portable battery pack with clamps and a control circuit |
Correct system voltage, charged battery, model-specific instructions |
|
Positive terminal |
Battery or remote post marked + |
Often under a red cover; verify the symbol rather than color alone |
|
Negative terminal |
Battery post marked - and tied to vehicle ground |
On the donor vehicle, this accepts the third clamp |
|
Ground point |
Clean, solid, unpainted metal specified or allowed by the vehicle maker |
Away from the disabled battery, fuel lines, belts, and fans |
|
Reverse polarity |
Positive and negative are connected backward |
Disconnect safely and inspect before trying again; protected packs may block output |
The method below is for conventional 12V passenger vehicles. Never assume two vehicles are compatible because both are cars. Confirm voltage and the approved jump points in both manuals. A vehicle-service bulletin hosted by the National Highway Traffic Safety Administration warns that a booster must match the vehicle's system voltage and tells technicians to review the operator's manual before jump-starting.
A North Carolina Department of Transportation safety procedure also places the final black connection on an engine or chassis ground away from the disabled battery.
Choose cables that can do the job
Cable condition matters more than a shiny storage bag. Thin conductors create more resistance, long cables add resistance, and weak clamps reduce the contact area. AAA's guidance suggests a heavy-duty 6-gauge, 16-foot set as a practical general-purpose choice, particularly for larger engines or cold conditions. Your vehicle manual and the cable maker remain the final authorities.
|
Cable feature |
Practical selection |
Why it matters |
|
Voltage compatibility |
Use only with the system voltage specified by both vehicle manuals; most modern passenger cars are 12V |
A mismatched source can damage electronics or create a fire or explosion hazard |
|
Conductor gauge |
Lower AWG numbers indicate thicker conductors; a 6-AWG set is a useful general-purpose benchmark |
Thicker conductors usually carry starting current with less voltage drop |
|
Length |
About 16 ft is easier to route between safely positioned vehicles than a short set |
Extra reach reduces the temptation to let vehicles touch or stretch cables across moving parts |
|
Clamp quality |
Strong spring tension, broad metal contact, insulated handles |
Poor contact can heat the clamp and prevent enough current from reaching the starter |
|
Insulation |
Flexible, uncut, and free of exposed wire |
Cracked insulation raises short-circuit and shock/burn risks |
|
Storage condition |
Dry, loosely coiled, clamps kept apart |
Corrosion and crushed insulation can make an emergency set unreliable |
Do not use a set with exposed copper, melted insulation, badly rusted jaws, or a loose clamp. Do not patch a damaged high-current cable with ordinary tape and treat it as repaired. Replace it.
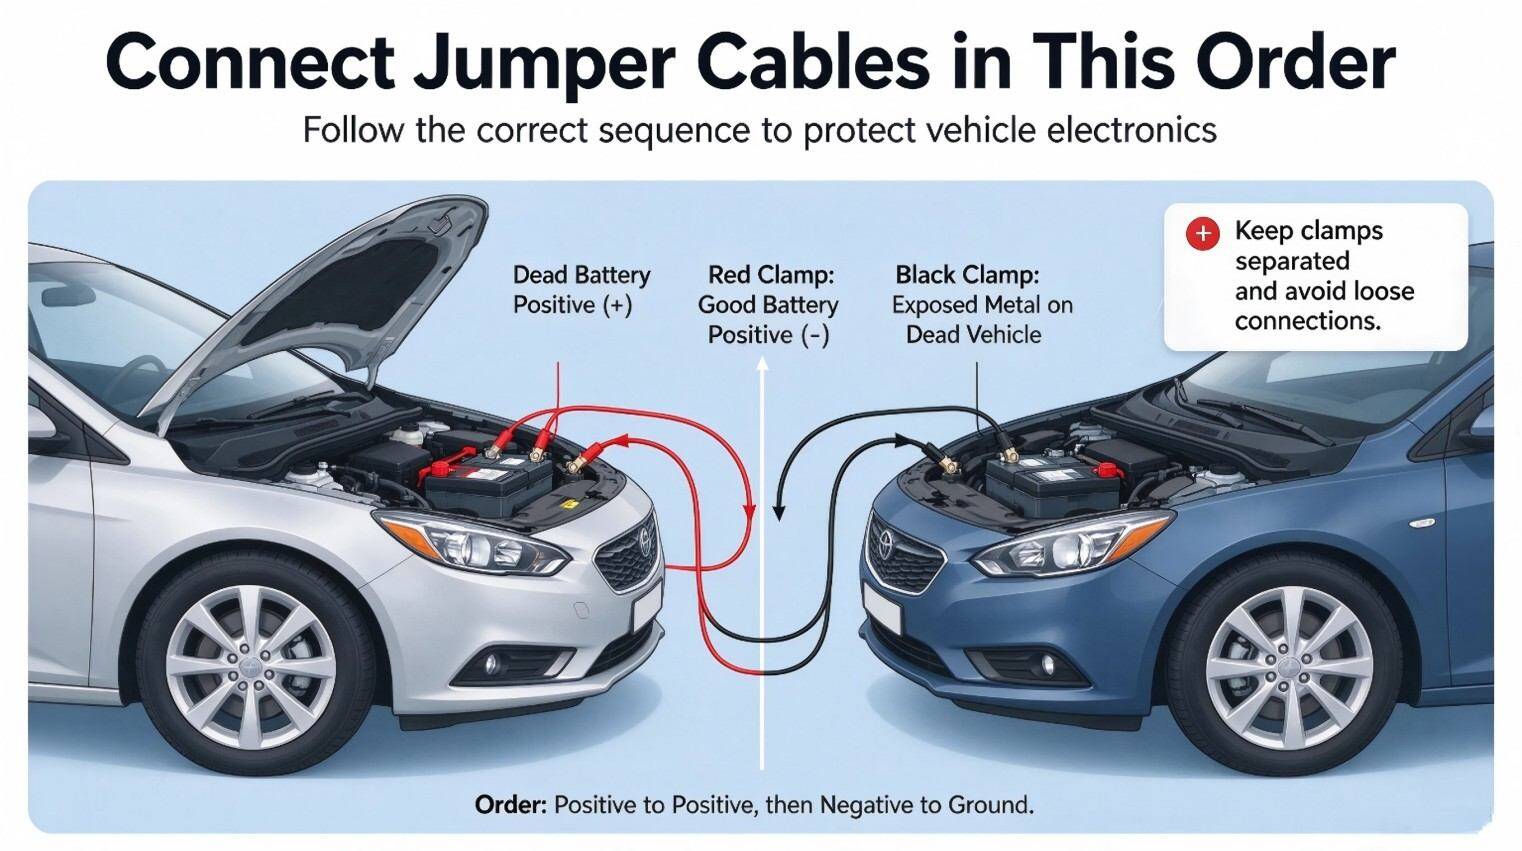
Eight steps: how to use jumper cables safely
This sequence follows the commonly published safety order: dead positive, donor positive, donor negative, then disabled-vehicle ground. The last connection stays away from the disabled battery, where a spark could ignite gas. Read the full sequence before touching a clamp.
|
Step |
Action |
Check before moving on |
|
1 |
Inspect both vehicles, batteries, manuals, and cables |
No damage, leakage, freezing, smoke, or incompatible voltage |
|
2 |
Position vehicles without letting them touch |
Cables reach without crossing belts or fans |
|
3 |
Switch off engines and accessories; set parking brakes |
Keys/ignition off, transmissions in Park or Neutral |
|
4 |
Connect red to disabled positive |
Clamp is firm and touches only the intended post |
|
5 |
Connect the other red clamp to donor positive |
Positive-to-positive is confirmed |
|
6 |
Connect black to donor negative, then final black to disabled-vehicle ground |
Final clamp is on approved clean metal away from the battery |
|
7 |
Start donor, wait briefly, then start disabled vehicle |
Stop repeated cranking if it will not start |
|
8 |
Disconnect in reverse order |
Clamps never touch each other or moving parts |
Step 1 — How to use jumper cables on a car: inspect before connecting
Open both manuals and locate the approved jump points. A battery may sit under a seat or in the trunk while the manufacturer provides remote terminals under the hood. Use those points when instructed. Check each battery for cracks, swelling, leaks, loose terminals, ice, smoke, or a rotten-egg smell. Do not proceed if any warning sign appears.
Wear eye protection and remove dangling jewelry. Keep cigarettes, flames, and sparks away. AAA Club Alliance warns that placing the final negative clamp on the dead battery can create sparks and a fire risk. Make sure both batteries have the same rated voltage. Clear corrosion only if you can do so safely and according to the manual.
Step 2 — How to use booster cables: position both vehicles
Park the donor vehicle close enough for the cables to reach, but do not let the vehicles touch. Put automatic transmissions in Park and manual transmissions in Neutral. Apply both parking brakes. Route the cables away from fans, belts, pulleys, and hot exhaust parts. Never stretch a cable so tightly that a clamp can be pulled loose when an engine moves.
If traffic, darkness, poor weather, or the road shoulder leaves no safe working space, do not attempt the jump. Move to safety if possible and call for assistance. Getting the engine running is not worth standing in a live traffic lane.
Step 3 — How to jump a car with jumper cables: shut everything down
Turn off both ignitions before making connections. Switch off lights, climate control, audio systems, chargers, and other accessories. Unplug sensitive devices where the vehicle manual recommends it. Confirm once more that the donor and disabled systems are compatible.
Lay the cables out so all four clamps are separated. Do not allow red and black clamps to touch while any clamp is connected to a battery. Hold clamps by their insulated handles.
Step 4 — How to jumpstart a car with jumper cables: connect the first red clamp
Attach one red clamp to the positive (+) terminal or approved positive jump post on the disabled vehicle. The metal jaws need firm contact with clean metal. Reposition the clamp if it sits on plastic, paint, or heavy corrosion.
This is the first live connection. Keep the free clamps separated and prevent the free end of the red cable from touching the body, engine, or tools.
Step 5 — How to jumpstart a car with cables: complete the positive side
Attach the other red clamp to the donor battery's positive (+) terminal or designated positive post. Pause and trace the cable visually: red must run from positive to positive. Do not continue if the terminal symbols are hidden or ambiguous.
A terminal cover may be red, but color is only a clue. The stamped or molded + and - symbols are the reliable identifiers.
Step 6 — How do you use jumper cables to jumpstart a car? Finish the negative side
Connect one black clamp to the donor battery's negative (-) terminal. Make the final connection on the disabled vehicle: attach the remaining black clamp to the manufacturer-approved ground point or a solid, clean, unpainted metal part of the engine or chassis away from the battery. Do not place it on a fuel line, carburetor, thin bracket, moving component, or the disabled battery's negative post unless the vehicle maker explicitly directs you there.
This final ground location is deliberate. The North Carolina Department of Transportation procedure and AAA Club Alliance both give the same dead-positive, donor-positive, donor-negative, engine/chassis-ground sequence.
Step 7 — How to use jumper cables to jumpstart a car: start in order
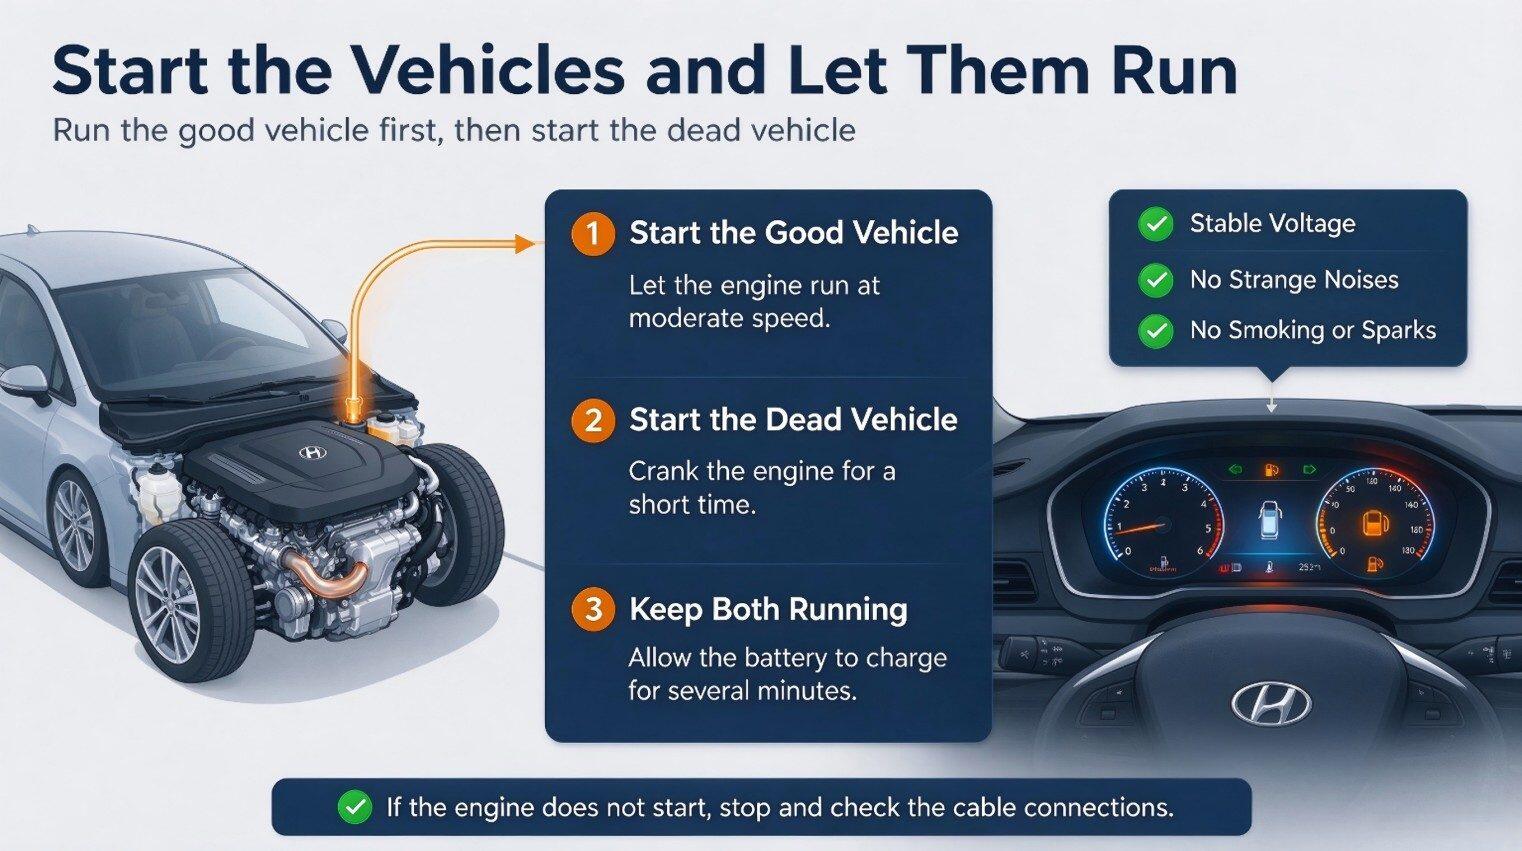
Check that every clamp is secure and every cable is clear of moving parts. Start the donor vehicle. Follow the vehicle maker's instruction for idle time; AAA's Auto Repair guidance uses a three-to-five-minute wait before the first attempt. The owner's manual takes priority if it gives a different procedure.
Try to start the disabled vehicle. Do not hold the key or start button continuously if the engine does not catch. Repeated, long cranking can heat cables, clamps, the starter motor, and the donor system. If the car does not start after a brief attempt, stop, switch both vehicles off, and check clamp contact and the manuals. A battery with an internal fault, a failed starter, a charging-system problem, or an unrelated engine problem will not be fixed by more cable time.
Step 8 — How to use jumper cable safely when disconnecting
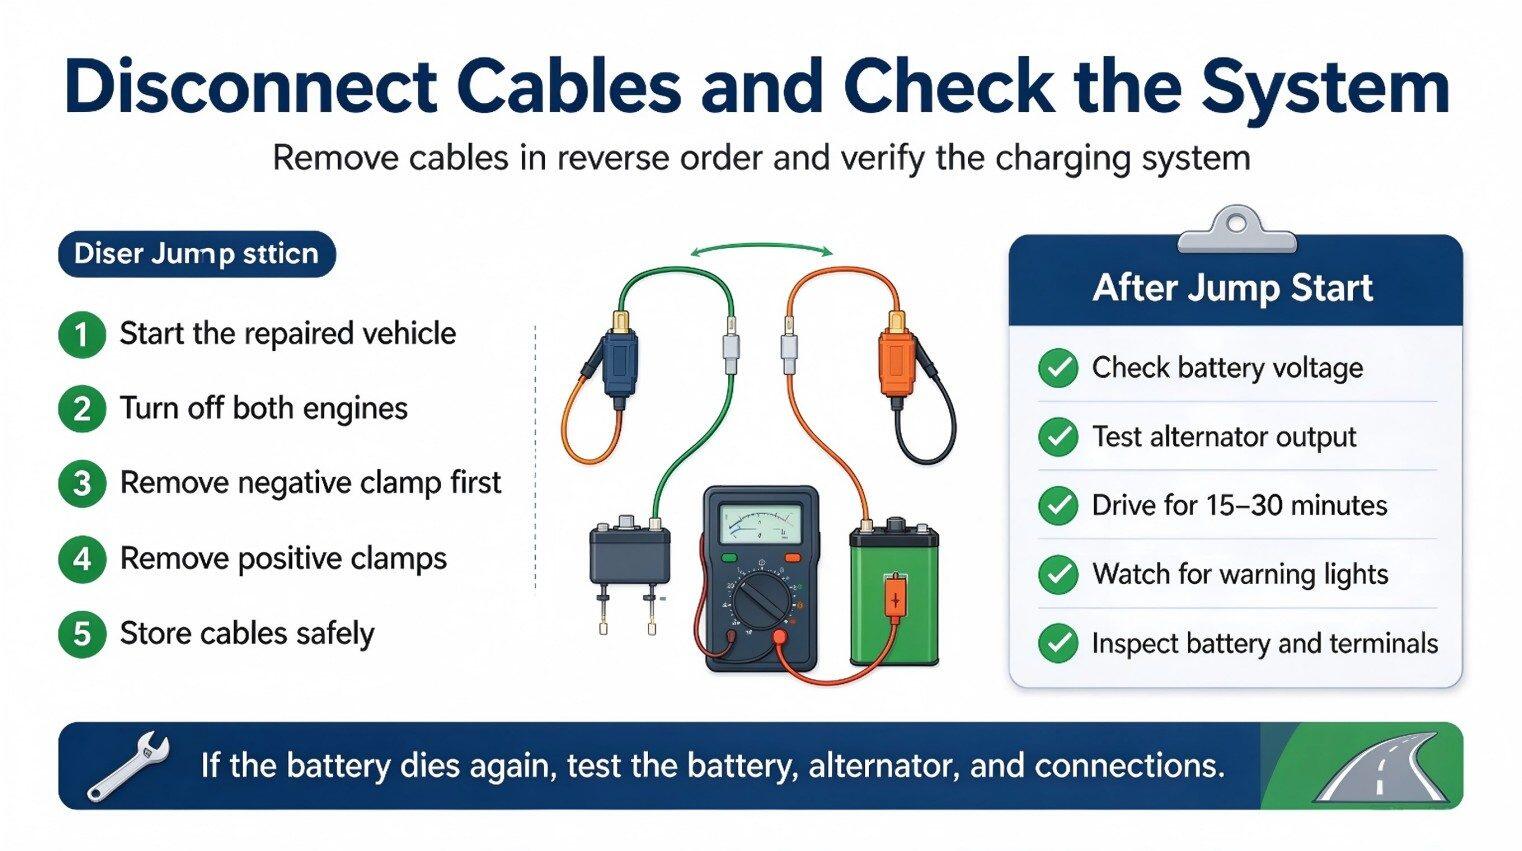
Once the disabled engine is running steadily, keep hands, clothing, and cables away from belts and fans. Disconnect in the exact reverse order:
- Remove the black clamp from the ground point on the previously disabled vehicle.
- Remove the black clamp from the donor battery's negative terminal.
- Remove the red clamp from the donor battery's positive terminal.
- Remove the red clamp from the newly started vehicle's positive terminal.
Keep every free clamp from touching another clamp, the bodywork, or moving parts. Do not assume a short drive has repaired the battery. AAA Club Alliance suggests letting the restarted vehicle run for at least 30 minutes, while AAA's Auto Repair guidance recommends going to a repair shop if the battery appears to have failed. If the battery goes flat again, have the battery and charging system diagnosed and fully charge it with appropriate equipment.
How to use jump cables to start a car without common mistakes
Most failed jump attempts are not mysterious. They come from the wrong connection point, poor contact, unsuitable equipment, or a fault that a jump cannot solve.
|
Mistake or symptom |
Why it matters |
Safer response |
|
Connecting the final black clamp to the dead battery |
A spark occurs close to battery gas |
Use the approved remote ground or clean engine/chassis metal away from the battery |
|
Reversing polarity |
May damage fuses, charging components, control modules, or the batteries |
Verify + and - before each connection; stop if unsure |
|
Jumping a frozen, cracked, leaking, or swollen battery |
The case or internal damage may create an explosion or acid-exposure risk |
Do not jump it; arrange professional service |
|
Letting vehicles touch |
Can create an unintended electrical path |
Reposition with space between vehicles |
|
Using frayed or corroded cables |
Raises resistance and short-circuit risk |
Replace the cable set |
|
Clamping over paint or corrosion |
Restricts current and can heat the connection |
Use a clean, solid approved contact point |
|
Letting cables cross fans or belts |
Moving parts can pull or cut the cable |
Reroute before starting either engine |
|
Repeated long cranking |
Can overheat the starter, cables, and power source |
Stop after a brief attempt and diagnose the cause |
|
Assuming a jump repairs the battery |
A jump supplies starting energy but does not cure aging or internal damage |
Fully charge and test the battery and charging system |
Reverse polarity deserves a direct warning. If you realize the clamps are backward before either vehicle is started, do not improvise. Switch everything off, keep clear of the batteries, and follow the manuals' safe disconnection procedure. If there was a large spark, heat, smoke, melted insulation, or an alarm from a protected device, stop and get professional help.
Traditional cables versus a portable jump starter pack
Jumper cables work well when a compatible donor vehicle is available and both vehicles can be positioned safely. Their weakness is dependence: you need another driver, sufficient space, and access to both batteries or remote posts. A portable jump starter carries its own power source, so one person can connect it to the disabled vehicle without a donor car.
|
Situation |
Jumper cables and donor vehicle |
Portable jump starter pack |
|
Power source |
Compatible working vehicle |
Charged internal battery pack |
|
People/vehicles needed |
Usually two vehicles and often another driver |
One vehicle and one operator |
|
Connection points |
Four clamp connections across two vehicles |
Positive and negative/ground connections on one vehicle |
|
Storage readiness |
Cables do not need charging |
Pack must be checked and recharged periodically |
|
Protection |
Depends on technique and equipment |
Model-dependent control circuit may block reverse polarity, shorts, or overheating |
|
Best fit |
Planned help in a safe, open location |
Solo travel, tight parking, roadside kit, or no donor vehicle |
The Eigotrav jump starter collection includes portable 12V options for this use. The PD-J220 is the simpler choice when the priority is starting support, an LCD, and an LED light. The PD-JA2 6000A peak model adds a 150 PSI compressor, pressure display, preset inflation modes, a USB-A output, and a 600-lumen light according to its product page.
A portable pack still requires correct polarity, a suitable ground, and compliance with both manuals. Its battery must also be charged. Do not assume a protection circuit makes every connection harmless, and do not use a manual override unless the exact model's instructions confirm that function and explain when it is safe. The Eigotrav guide to how jump starters work explains voltage detection, current delivery, cutoff protection, and common reasons a smart clamp may refuse to energize.
Frequently Asked Questions
How to jumpstart a car battery with cables if it is completely dead?
Use the normal four-connection sequence only if the battery is intact, not frozen, and the vehicle manual permits jump-starting. A battery that reads extremely low may have an internal fault or may not accept enough energy to crank. If secure clamps and a compatible donor source do not produce a normal start after a brief attempt, stop. More attempts are not a diagnosis. Arrange a battery and charging-system test.
How do you jump a car when there is no second vehicle?
For an automotive search, the practical answer to “how do you jump” without a donor vehicle is to use a charged, compatible portable jump starter pack. Connect its red clamp to the approved positive terminal and its black clamp to the approved ground point, then follow that pack's instructions. A unit such as the Eigotrav PD-J220 is designed for 12V vehicles and does not require another car, but compatibility and battery condition still matter.
How do you jumpstart a car with jumper cables in the rain?
Do not work where you are exposed to traffic, standing water, flooding, or lightning. Ordinary rain does not change the required polarity or connection order, but wet hands, poor visibility, and slippery footing add risk. Keep cable connections out of pooled water, follow both vehicle manuals, and call roadside assistance if the location is unsafe.
How to jump a car with cables if the battery is in the trunk?
Look for manufacturer-designated remote jump terminals, often under the hood, and use them exactly as the owner's manual directs. Do not extend the procedure by guessing at hidden posts or grounding points. A remote positive post may sit under a marked cover, while the approved ground may be a dedicated stud or chassis point.
How to jump start a dead battery without damaging electronics?
Match system voltage, switch ignitions and accessories off before connecting, use the specified jump points, verify polarity at every clamp, and remove the cables in reverse order. Never use a higher-voltage source. Some vehicles restrict jump-starting or specify special procedures, so the owner's manual takes priority over any general guide.
How to use jump start cables on a car with start-stop, hybrid, or electric systems?
Do not apply the general cable procedure until the model's manual explicitly permits it. Start-stop vehicles may use specialized battery systems and monitoring; hybrids and electric vehicles can have separate low-voltage and high-voltage systems. Never touch orange high-voltage cables or components. Use only the designated low-voltage jump points and procedure, or request qualified assistance.
Keep the car ready for the next flat battery
After the engine starts, schedule a proper battery and charging-system check if the cause was not obvious. A dome light left on once is different from a battery that repeatedly loses charge. Clean and secure terminals, a tested alternator, and a battery that meets the vehicle's specification matter more than repeated emergency starts.
Store cables dry and inspect them before the next trip. If you prefer not to depend on a second vehicle, choose a portable pack that matches your 12V vehicle and published engine range, then charge and inspect it on the interval in its manual. Compare Eigotrav's portable jump starter options, or choose the PD-J220 for a compact starting-focused kit and the PD-JA2 when a built-in tire inflator is useful. Keep the pack accessible rather than buried under luggage, and read its instructions before an emergency.
The safest method is the one you can perform without guessing. Check the symbols, use the approved ground, keep the last connection away from the disabled battery, and stop when the battery or location looks unsafe.
Recommend reading
Subscribe To Our Newsletter
You Can Get The News Of Our Products
SIGN UP
To be the most trusted mobile energy companion worldwide — making every drive, every trip, and every adventure worry‑free.
📮support@eigotrav.net
Payment Methods